Today I gave a presentation about machine learning and IoT focusing on industrial maintenance. The event was the third industrial maintenance workshop in Belo Horizonte. An opportunity to talk about IBM Watson and IIoT to the industry in my region.
Today I gave a presentation about machine learning and IoT focusing on industrial maintenance. The event was the third industrial maintenance workshop in Belo Horizonte. An opportunity to talk about IBM Watson and IIoT to the industry in my region.
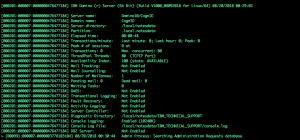
Domino 10 beta 2 started last week. I download the files and wish to run it on docker.
I follow Tim Clark’s blog series about Domino 9.0.1 on Docker.
I change a few lines on dockerfile (just change the installation file name).
Another difference was the line to start the container. I add the port 8585 to do a remote setup
docker run -it -p 1352:1352 -p 8888:80 -p 8443:443 -p 8585:8585 –name Domino10Beta -v domino_data:/local/notesdata kenio:Domino10Beta2
I ordered two servers from SoftLayer to host some wordpress sites.
I tried to update the server using yum update but i got the error bellow
Loading mirror speeds from cached hostfile
http://mirrors.service.networklayer.com/centos/7/os/x86_64/repodata/repomd.xml: [Errno 12] Timeout on http://mirrors.service.networklayer.com/centos/7/os/x86_64/repodata/repomd.xml: (28, ‘Connection timed out after 30001 milliseconds’)
Trying other mirror.
http://mirrors.service.networklayer.com/centos/7/os/x86_64/repodata/repomd.xml: [Errno 14] curl#56 – “Callback aborted”
Trying other mirror.
http://mirrors.service.networklayer.com/centos/7/extras/x86_64/repodata/repomd.xml: [Errno 14] curl#56 – “Callback aborted”
Trying other mirror.
http://mirrors.service.networklayer.com/centos/7/updates/x86_64/repodata/repomd.xml: [Errno 14] curl#56 – “Callback aborted”
The first problem: DNS server is not correct on resolv.conf
The second problem: The repos for yum was changed by softlayer and you need to revert the file CentOS-Base.repo to the original file.
Many people want to start their studies in neural networks and machine learning as a whole. So I decided to make a guide that I’m using to study these two technologies.
First, you have to choose a language. I chose Python.
Python can be downloaded through the Anaconda distribution, which in addition to packing in a functional way, still has a control panel for installations from other libraries: https://www.anaconda.com/download.
Now, you’re going to need an IDE. Do I currently use Visual Studio Code https://code.visualstudio.com.
Don’t know Python?
Follow the Basic Tutorial category at https://www.tutorialspoint.com/python/index.htm. It’s a start. There are many good courses in Coursera, Udemy, and EDX.
After doing the tutorial, some libraries are a “must have” for machine learning:
-Numpy, library for arrays and mathematical functions: https://pypi.python.org/pypi/numpy-Matplotlib
– For plotting graphics and viewing data: https://matplotlib.org/downloads.html
-OpenCV, for viewing and editing images via Python: https://opencv.org/releases.html
For those who want to deal with classic machine learning, we have:
-Scikit-learn, Python library with all sorts of algorithms: http://scikit-learn.org/stable/install.html
-Weka, application with a graphical interface for reading data, preprocessing and machine learning algorithms: https://www.cs.waikato.ac.nz/ml/weka/downloading.html .
For those who plan to deal with neural / deep learning networks, it’s a different track.
There are four major frameworks: TensorFlow, Keras, PyTorch, and Theano. I use TensorFlow.
Do you want to understand how these initial networks work with a visual explanation?
The TensorFlow has a playground for you: http://playground.tensorflow.org .
After reading this material, it’s time to install the TensorFlow. His installation is a little nauseous, so READ. It will prevent further headaches, but in a summary it is:
-Install the CUDA Toolkit, and check that the system variables are correct (check even, there is a chance that you would not install it correctly)
-Install the CUDA Toolkit drivers-Install the cuDNN-Install TensorFlow, version CPU, or GPU (preferably have only one installation).
When you install, follow the step-a-step of the TensorFlow itself. https://www.tensorflow.org/install
Installed? Tested? Now you don’t know where to start?
TensorFlow himself has good tutorials to start dealing with him. Recommend two tutorials:
-A MNIST-based tutorial, a historical basis of handwritten digits: https://www.tensorflow.org/tutorials/layers
-A tutorial for CIFAR-10, a historical base of 60,000 images of 10 different types: https://www.tensorflow.org/tutorials/deep_cnn
You want more tutorials? It also has: https://www.tensorflow.org/tutorials. Learn how to use the TensorBoard, manager and visualizer of TensorFlow’s neural networks.
Until you save the current state of the network to reload then you can: https://www.tensorflow.org/progra…/summaries_and_tensorboard http://ischlag.github.io/2016/06/04/how-to-use-tensorboard.
Do you want a site with historical and classic databases?
Access the UCI Machine Learning Repository: https://archive.ics.uci.edu/ml
Do you want a site with current and complex databases?
Create an account on Kaggle: http://www.kaggle.com
Do you want a list of datasets with the current state of art and other applications for these bases (including the MNIST and CIFAR-10)?
You have it here: http://rodrigob.github.io/are_we_there_yet/build/
Do you find a base you want to work on?
You want to know how people are solving a particular problem? So get ready to read papers, get ready to read LOTS OF PAPERS, and they’ll probably be posted here: https://arxiv.org.
Have you got any questions about how some network works?
Probable that the Siraj Raval has already explained: https://www.youtube.com/channel/UCWN3xxRkmTPmbKwht9FuE5A
If you want any more reliable sites for explanations of any network / architectural/problem solution that you have, I recommend the O’ Reilly Media (https: //www.oreilly.com/) and Medium (https: //medium.com/)
It also has the following list:
http://ai.google/education-Google course
https://see.stanford.edu/course/cs229-Classic CS229, milestone in the area, but quite extensive.
https://br.udacity.com/courses/machine-learning
-There are several courses in Udacity, beyond the nanodgrees, some paid, other free, it’s even difficult to choose which to study if you have any other questions about what or how to search, remember: Google Is Your Friend.
Thanks to Ayrton Denner for this guide.
IBM publised a TechNote listing links and pdf files about GDPR for ICS products
See the TechNote here
Thanks to Robert Ingran for sharing this.
Command line tools are always welcome. Today i need to setup my MAC to work with IBM Cloudant
Install curl on your MAC if you haven’t done it yet.
1 – You need to setup the Cloudant DB using your IBM Cloud account.
2 – Go to service credentials and get your username, password and hostname
Sample:
"username": "xxxx-xxx-xxx-bluemix",
"password": "12345678901234567890",
"host": "xxxx-xxx-xxx-bluemix.cloudant.com"
3 – Test the connection
curl –v –u xxxx-xxx-xxx-bluemix 'https://xxxx-xxx-xxx-bluemix.cloudant.com'
The command will prompt for the password: 12345678901234567890
You will see a lot off lines but pay attention on the line Authorization: Basic. This will be used to setup acurl (authorized curl) to avoid type the password every time you use curl.
* Using HTTP2, server supports multi-use
* Connection state changed (HTTP/2 confirmed)
* Copying HTTP/2 data in stream buffer to connection buffer after upgrade: len=0
* Server auth using Basic with user ‘xxxx-xxx-xxx-bluemix’
* Using Stream ID: 1 (easy handle 0x7fabd0805800)
> GET / HTTP/2
> Host: xxxx-xxx-xxx-bluemix.cloudant.com
> Authorization: Basic asddadasdDASDdaDadaDSERQERQRQERQEDSGSFDGSFDG==
4 – Edit the .bash_profile or .bashrc file in any text editor. For example, from the command line, issue the following command:
open –e .bash_profile
5 – Add the following line to the file, then save the file.
alias acurl="curl -s --proto '=https' -g -H 'Authorization: Basic asddadasdDASDdaDadaDSERQERQRQERQEDSGSFDGSFDG=='"
6 – On the terminal run : source .bash_profile
7 – Issue a command using the new alias. For example, issue a command to view your account information.
acurl -X GET 'https://xxxx-xxx-xxx-bluemix.cloudant.com'
TIP: The hostname is not friendly you can edit your hosts file and create an alias:
On MAC terminal type: sudo vi /etc/hosts
ping your hostname to get the ip address
add a line like this one bellow:
<ip address> xxxx-xxx-xxx -bluemix.cloudant.com keniodb.cloudant.com
Save the hosts file
test the connection
acurl -X GET 'https://keniodb.cloudant.com
I meet several people when i was in Las Vegas. No one know about my city until i talk about 2014 Soccer World Cup and tell about Germany 7 x 1 Brazil game.
The video bellow, show another face of the city.
For professionals who bill on an hourly basis—lawyers, accountants, and so on—time tracking is a critical part of the billing process.
A time-tracking tool that allows them to easily enter work hours and obtain summary reports at the end of the week or month is of critical importance.
In this tutorial, you will see the process of building a simple time-tracking tool and deploying it on IBM Cloud.
Today i got the following error when i install watson python sdk on my MAC:
I use the command : sudo pip install watson-developer-cloud
The exception was:
Traceback (most recent call last):
File “/Library/Python/2.7/site-packages/pip/basecommand.py”, line 215, in main
status = self.run(options, args)
File “/Library/Python/2.7/site-packages/pip/commands/install.py”, line 342, in run
prefix=options.prefix_path,
File “/Library/Python/2.7/site-packages/pip/req/req_set.py”, line 778, in install
requirement.uninstall(auto_confirm=True)
File “/Library/Python/2.7/site-packages/pip/req/req_install.py”, line 754, in uninstall
paths_to_remove.remove(auto_confirm)
File “/Library/Python/2.7/site-packages/pip/req/req_uninstall.py”, line 115, in remove
renames(path, new_path)
File “/Library/Python/2.7/site-packages/pip/utils/__init__.py”, line 267, in renames
shutil.move(old, new)
File “/System/Library/Frameworks/Python.framework/Versions/2.7/lib/python2.7/shutil.py”, line 299, in move
copytree(src, real_dst, symlinks=True)
File “/System/Library/Frameworks/Python.framework/Versions/2.7/lib/python2.7/shutil.py”, line 208, in copytree
Solving the problem:
sudo -H pip install –ignore-installed six watson-developer-cloud
After a few seconds:
Successfully built watson-developer-cloud Twisted zope.interface pycparser
Installing collected packages: six, certifi, chardet, idna, urllib3, requests, python-dateutil, txaio, autobahn, setuptools, zope.interface, constantly, incremental, attrs, Automat, hyperlink, Twisted, pycparser, cffi, enum34, asn1crypto, ipaddress, cryptography, pyOpenSSL, pyasn1, pyasn1-modules, service-identity, watson-developer-cloud
IBM Watson Assistant is named as a Leader in conversational computing. It has become increasingly important for businesses to build engaging interactions that deliver value to their customers, and IBM is proud to offer technologies that help developers and enterprises enhance those experiences.
The report evaluated the most significant conversational computing platforms, diving into each vendor’s current offering and strategy and including customer feedback.
I always work with IBM Watson Assistant to create Virtual Assistants, since the name was “dialog”. This service is my first option to create conversational applications.
More information on this link
Today i need to rename lots of files from .txt to .json. I type the following on the terminal window:
for f in *.txt; do
mv "$f" "$(basename "$f" .txt).json"
done
You can enable Cross Origin Resource Sharing (CORS) for your web applications on a Liberty server.
Enabling CORS will allow JavaScript clients to make requests against your application on the Liberty server even if the client and the server are on two different domains. Web browsers prevent these requests due to same-origin policy.
I create the following configuration on my local machine on server.xml file:
<cors domain="/ApplicationContext" <-- application context. It will work only for this app.
allowedOrigins="http://localhost:8080" <-- this is my local Node.js Server.
allowedMethods="GET, HEAD, POST, PUT"
allowedHeaders="Referer, Cache-Control, Pragma, Accept, Accept-Language, Accept-Encoding, Accept-Charset, Content-Type, Content-Length, User-Agent, Authorization, passwd, X-Update-Nonce, X-Shindig-ST, X-IC-CRE-Request-Origin, X-IC-CRE-User, X-LConn-Auth, Accept*, Content*, Access-Control-Allow-Origin*"
exposeHeaders="Content-Type, Last-Modified, etag"
allowCredentials="true" maxAge="3600" />